Showing posts with label nail art. Show all posts

Thursday, November 27, 2014

Norway Nails Nail Art Diabetes Awareness Contest Entry (2013)


Hello everyone!


This was my entry for the Norway Nails Nail Art Diabetes Awareness Contest in 2013. As you might have seen on facebook, I didn't win. You can see the winner manicure here. :-) I'm going to write a little about diabetes, and give you some links. Just click on the blue words if you want to know more. To read about this nail art, scroll down.


This is is a part of what Wenche, from Norway Nails (sells indie nail polish), wrote about why she chose to host this nail art contest:

"In october last year I were diagnosed with Diabetes 2 - the 14th of November are the World Diabetes day. I think it's important to spread awareness around this disease and how to prevent getting it and to manage it if you already got it. 

So - I'm putting up a nail art contest that will run from today until the 13th of november."

(I hope it's ok that i added the links above.)


Very short about diabetes:

Diabetes is a serious illness. It has to do with too little production of insulin or that insulin cannot be processed, and the glucose level gets too high. If you have diabetes, you can get many other deceases later in your life, if the long-term glucose levels are high. One thing you have to pay close attention to is wounds, because wounds can take longer to heal if you suffer from diabetes. There are very many types of diabetes.

These 3 are the main types of diabetes:

Type 1 is the most serious, and you will need injections with insulin to stay alive. Luckily the insulin pen was invented, and that made it much easier to regulate the insulin level and it allows people to be more free regarding to what they can eat, and they no longer have to stay on a very strict diet. Many get it early in life, and that can be a challenge. I still remember how my friend cried when she had to get her injections when she was a child. It can also be a challenge for adolescents to stay on a very strict diet and to not be able to party like their friends.
Type 2 diabetes is the most common (90%), and it often affects people who are overweight. Many can get well by simply loosing weight. This type of diabetes can in many cases be prevented by living a healthy life and maintaining a normal weight. But people in the world are getting bigger and bigger, and that makes diabetes a huge problem worldwide. 
Gestational diabetes (GDM) affects 25% of all pregnant women. Although many get well after giving birth, it's important to be aware of it, because it can lead to complications for both child and mother.

What you should do:

Be aware of the symptoms.
Get your glucose level checked every year. Remember to not eat the day you take the test. This can be measured in urin or a blodtest. And ask for both a glucose test and a HbA1c test (measures long term glucose level).
Be aware of the risk factors.

I also found this link: How Does Obesity Cause Type 2 Diabetes?


About the nails:

I wanted to use LilypadLacquer: Blueberry, a blue jelly, because blue is the color for diabetes awareness. And because I got it as a free sample when I bought something from Norway Nails. And because making a "stampwich" was the weekly challenge in a stamping group back then. I used images with a curve going up and down, like the glucose level.


Products used:

LilypadLacquer: Blueberry
Emily de Molly: Belissima
Konad SN White
MoYou London: Suki Collection 08


What I did:

This was a year ago, so I don't remember exactly how many layers of the jelly I used, but I stamped between the coats of the blue jelly. On the thumb I put glitter between the layers. So this is a glitter sandwich and my first jelly stampwich. Emily de Molly describes the glitter in Bellissima as "Holographic silver, matte pink and holographic lavender dots and hexes". It has a clear base, and the silver and pastel colored glitter is perfect for jelly sandwiches. The stamping wasn't perfect, so I used a brush and white to try to make it perfect.


I bought the jelly and the glitter from Norway Nails.

Everything is 50% off if you use the code BLACK on Norway Nails tomorrow; Friday the 28th of November 2014! (00.01- 23.59. CET) She has international shipping. If you want to try the Norwegian brand Linda Johansen, I recommend Razzle Dazzle and Lilac Lilly.


Lani

Sunday, November 23, 2014

#52WPNMC - BROWN - Caramel Apple Nails - inspired by @polishpdxnails - #31Nails2014 Day 13: DRIP & Day 31: Recreate someone else's mani


Hello everyone!


This is supposed to look like red, green and yellow apples with caramel. I've never tasted caramel apples, but I love caramel, and when I saw a photo of  @polishpdxnails' Caramel Apple Nails, I wanted to try too. I had bought a caramel colored polish, and I should have done it then, when my nails were super short, and looked more like round apples.

With Seche Vite over the "caramel"

This nail art is for 3 challenges:

*BROWN is the theme for this week in the 52 Day challenge: The 52 Week PICK N MIX Challenge (#52WPNMC).

*And DRIP was the theme for Day 13 in the 31 Day challenge I tried to do in January: Nails Magazine's 31 Days of Nail Art Challenge 2014 (#31Nails2014). Better late than never, right?

*And #31Nails2014 Day 31: Recreate someone else's mani. @polishpdxnails' Caramel Apple Nails lookes more like the picture below, so I kind of made my own version.


Products used:

Base:
OPI: My Boyfriend Scales Walls - white
Yes Love: #007 - pastel green (pinkie & index finger)
Yes Love: #008 - yellow/ pastel orange (thumb & middle finger)
Yes Love: F21 - pastel coral (ring finger)

For the rough gradient:
Fan brush & non woven swabs
A stamping plate as pallette
GOSH: 610 Blissful - red
H&M: Amazon - bright green
Gina Tricot: #17 Aspen gold - yellow
HEMA: #443 - pastel yellow
HK Girl top coat
GOSH #600 Matte Effect top coat

For the caramel drip:
OPI: Going My Way Or Norway - pastel brown
Seche Vite top coat


The Yes Love nail polish was bought on the Friday market in Mogan, Gran Canaria. It was only 1 Euro for each! :-)

Lani


Sunday, November 16, 2014

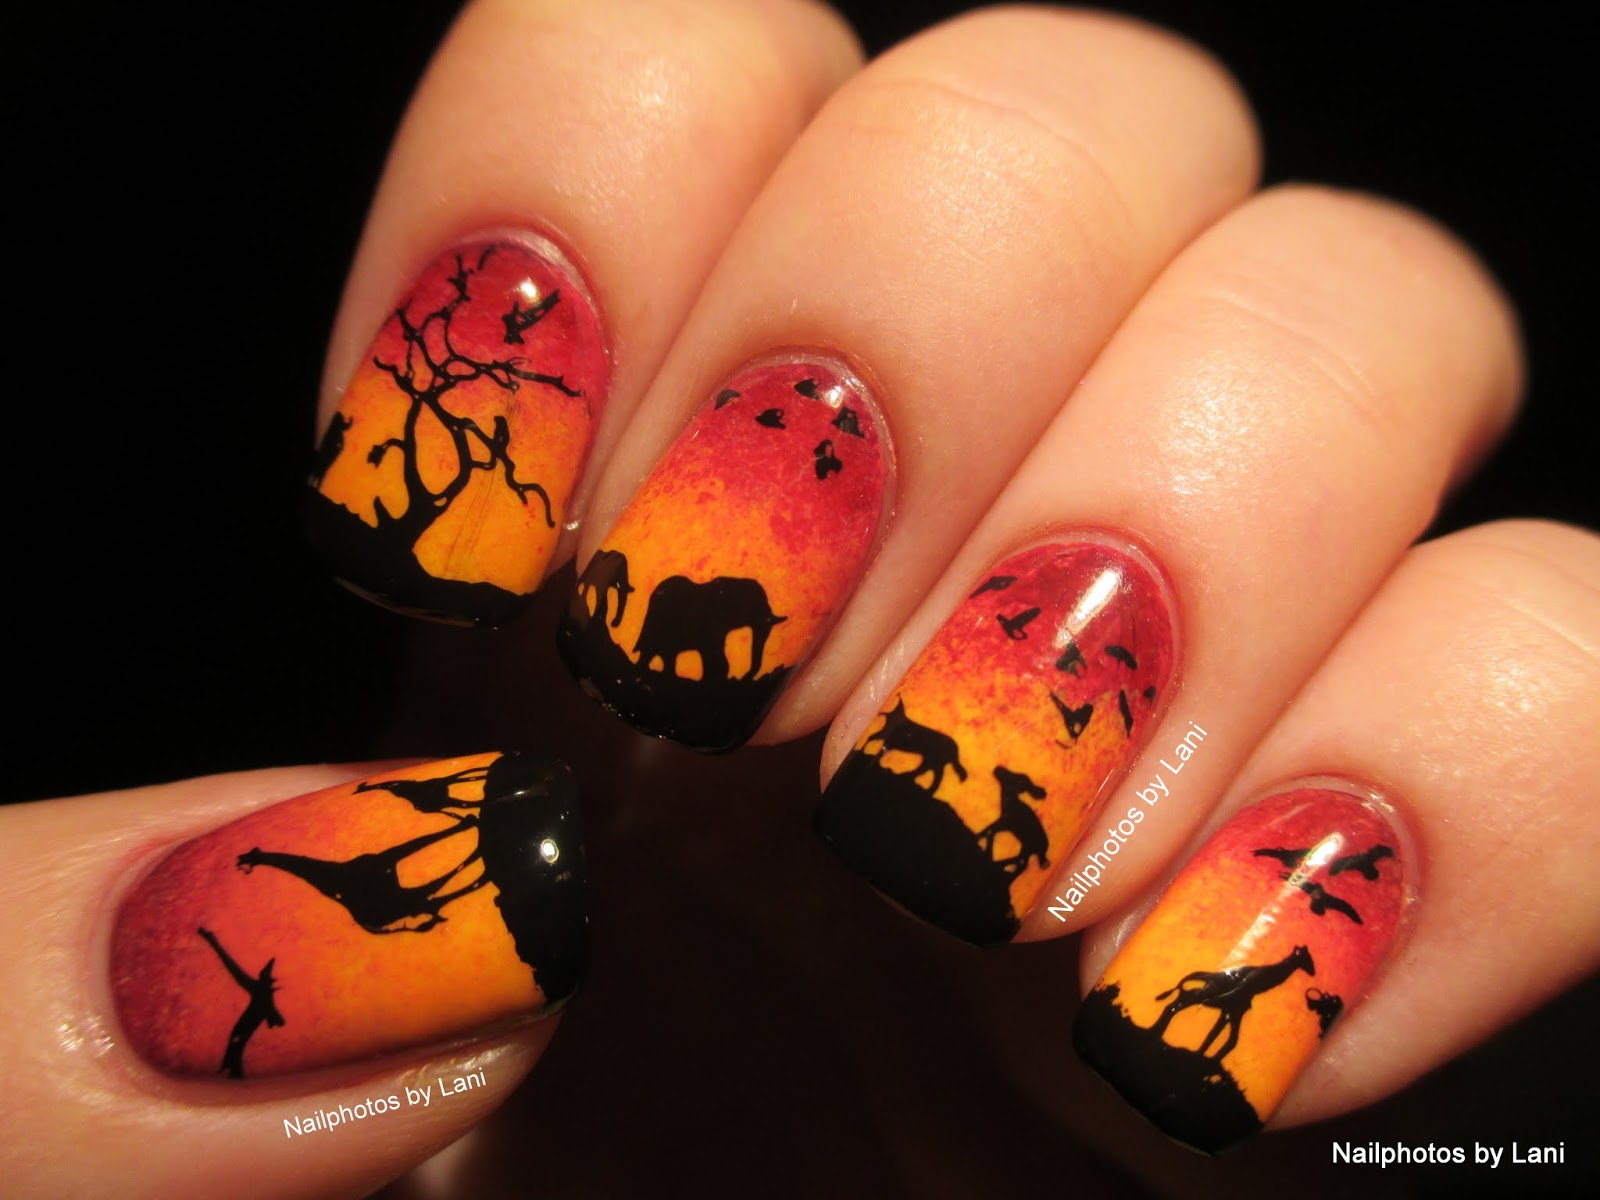
#52WPNMC - Wild Animals - African Sunset/ Sunrise Nails - stamping nail art


Hello everyone!


I had wanted to make African sunset/ sunrise nails for a long time, but when "wild animals" and "wildlife" were the challenges in two facebook groups, I finally made this today. All the pictures are taken inside, because we only have a few hours of winter daylight this time of the year.
Edited: I've added one photo taken in daylight, where you can see how shiny this mani is:

Daylight


What I did:

I was already wearing a coral creme nail polish called Coral Reef by Mineral Fusion (3 coats + Seche Vite.) First I made a red- orange gradient, then I stamped the African animals and the tree on. I used two MoYou London stamping plates; I used #04 from the Kitty Collection for the big giraffe on the thumb. All the other images are from Explorer Collection #23. (#23 is perfect for us with small nail beds, but they have a XL plate with bigger images.) I also used the black Konad stamping polish to paint the "Savannah" tips.


Products used: 

Gradient:
Ruby Kisses: Cheesum (orange)
Mineral Fusion: Coral Reef (coral)
Gina Tricot: #146 The red (red)
Gina Tricot: #7 Zinfandel (dark red)
a stamping plate as palette
a dotting tool to mix the colors
a piece of a car sponge to make the gradient

Stamping:
MoYou London: Explorer Collection #23 (plate for small nail beds. They have a XL size too)
MoYou London: Kitty Collection #04 (big giraffe)
Konad SP Black (stamping polish)
marshmallow XL stamper

To avoid problems, I used different top coats; HK Girl over the gradient, and Seche Vite after the stamping.

The index nail is broken again, so had to glue it and use silk wrap and resin.


Below you can see what the other 52 Week PICK N MIX Challenge participants made. This week we could make a yellow mani, wild animals nail art, or combine the two prompts.

Lani


Monday, October 6, 2014

52 Week PICK N MIX Challenge Week 1: Teal & ‪#‎31Nails2014‬: Day 6: Inspired by a NAILS cover


Hello everyone!


This nail art was inspired by the NAILS cover of the October 2012 Issue. I made this for day 6 in Nails Magazine's 31 Days of Nail Art Challenge 2014 ‪(#‎31nails2014‬) back in January. But because I haven't showed it here on the blog yet, and because "teal" is one of the prompts for week 1 in the new 52 week challenge, I'm writing about both today. First I'll tell a little about the new challenge, and then about trying to solve the task for #‎31nails2014 Day 6, which should be inspired by a NAILS cover. And at the end of the post you can see what everyone made for week 1 if you click on the Inlinkz Link Up. I'll also link to the #31Nails2014 nail art I've made so far.


The 52 Week PICK N MIX Challenge #52WPNMC consists of two prompts each week for a year, and we can make one of them or both or combine them. Needless to say, I'll probably not be able to make nail art and blog about it every week, but I'll do it when I can. This week I chose to do "teal", and next week I hope to do both a pattern and a color. But most weeks I'll probably do a combination. If you want to find out more, you can read what the creator of this challenge writes. Just click here.


‎31nails2014‬: Day 6: Inspired by a NAILS cover:

I struggled with this challenge. First I tried to make the baby blue to white gradient, and stamp a puzzle pattern over it, but apparently my sponge had dust on it... Then I tried to make caviar nails... And some other things happened. So a week of valuable time was lost. Then I got stuck on day 6, although I had made the ombre nails a week earlier. Finally on Friday I tried the "blue and green spray on water/ spotted nails", and it looked horrible in my Ott- Lite and indoor lighting. I wish we had more daylight in winter, so that I could make more challenges per day. And I struggled taking pictures in indoor lighting/ with an Ott- Lite without making the polish looking matte.


What I did & how it was supposed to be done:

This manicure is inspired by the OCTOBER 2012 ISSUE NAILS cover. After I made this nail art and applied a second coat of Seche Vite, I found out how it can be done, and a bigger picture of the cover nail art... Lol. Here is a picture tutorial. I used regular nail polish, and used different techniques back and forth until it looked a bit like the original manicure.


As MaeLing Parrish does in her tutorial, I started with a random pattern, but I used blues and greens. Then I stamped with blue stamping polish and Messy Mansion MM02. I saw that I had too much contrast, and tried to darken the light areas and to lighten the dark areas. To do that, I turned the plate into a palette by turning it, and used a dotting tool and some sheer polishes; a blue jelly, green flakie and blue flakie. And then I felt it needed more green. If you compare my manicure to the tiny little picture that I tried to copy, this doesn't look that bad.


Products used:

Christian Dior #489 Cobalt and here
Yes Love: F23
MI-NY: #177 Blue Sky
Gosh: #540 Ocean
Gosh: #618 Tilted Blue
Essence: #02 I'm backstage
Ruby Kisses: MNP29 Blue Ray Drama
Konad: SP Blue
Messy Mansion: MM02 (stamping plate & pallette) (used many many times)
XL stamper
Dotting tool
H&M: Blue Wave
Lilypad Lacquer: Blueberry (blue jelly)
Nfu- Oh: #56 (green flakie in green jelly)
Nfu- Oh: #52 (blue flakie in blurple jelly)
And as usual back then: IsaDora #600 Clear as base coat and Seche Vite top coat.

After the stamping I saw that I needed to make some changes, so I ended up using a lot of colors. I hope I have remembered all of them. If I do this again I now know which ones that worked best, so the list will be shorter.


In January one of my goals was to do this 31 Day Challenge. I did the nail art for some of the days, and we were allowed to use old nail art, so I didn't have many left to do. But I only made a few blog posts about them. I hope to show the rest before the year is over. You can see the ones I've made so far in my facebook photo album.

Lani

Friday, August 8, 2014

My Entry for Nail Polish Canada's Summer 2014 Nail Art Challenge


Hello everyone!


I was invited to participate in Nail Polish Canada's Summer 2014 Nail Art Challenge. That made me very happy! :-) This is my entry. You can look at all the entries and vote for your favorite here.


Products used:

OPI: My Boyfriend Scales Walls
Butterfly nail stickers from Born Pretty Store
Snails Nail Art Pen: Truffles
Palette
Small round brush
Dance Legend Wow Prism: #35 Inhale
Dotting tools
Ellagee: Cadium Glass
Kleankolor Chunky Holo: #228 Candy, # 233 Teal, #230 Fuchsia
+ base coat and a lot of Seche Vite


I will write a separate blog post about how I did this and about these products. I'll link to it here when I've written it. But the short version is: 1. white nails 2. butterfly stickers 3. draw flowers 4. paint green background 5 LeadLight technique.

I was given the nail stickers for review, and Born Pretty Store wanted me to give you this 10% off discount coupon code: NPBL10K31, in case you want to buy something. But it looks like they have a 80% summer sale this weekend. :-)
Thank you Born Pretty Store! ♥

The Elagee polish and the nail art pen were bought from Norway Nails, and almost everything is 50% off there this weekend if you use this discount coupon code: ENDOFSUMMER.


♥ I hope you like this nail art! Have a nice weekend! Thank you Celine for inviting me! ♥


Lani

Thursday, January 16, 2014

#31Nails2014: #2 Favorite color


Hello everyone!

I like very many colors, so to represent my favourite colors, I chose a multichrome nail polish that I've showed here on the blog before: Enchanted Polish 'Magical Mystery Tour'. I've used it for nail art several times. For Day 2 in Nails Magazine's 31 Days of Nail Art Challenge for January 2014 (31Nails2014), I've chosen to use this old photo:


Products used: Konad m51 & Enchanted Polish 'Magical Mystery Tour' & Konad: SP Black.

A click on the picture, or here, will take you to the blog post, where you can see lots of very different photos of this manicure. I've also used this multichrome polish for stamping nail art in this skittle, and this gradient. I've also written about this amazing nail polish and showed lots of photos of it on its own here.

This is my most photographed nail polish in 2013.

Lani

Sunday, December 1, 2013

Nail Polish Canada's 2013 HOLIDAY NAIL ART CHALLENGE WEEK 1 - SNOW


Hello everyone!


I was very surprised when Nail Polish Canada invited me to participate in their 2013 HOLIDAY NAIL ART CHALLENGE. It made me very happy! :-) I remember the beautiful manicures for last year's challenge, and and it's been very interesting to see what has been made so far this year. The challenge will run for three weeks (one mani per week). And we can participate one week or all three. The theme this first week is Snow, and we can make anything related to snow. This is my entry for week 1. As you hopefully can see, a snow fairy tried to make pink snow in her little Winter Wonderland on my nails. As usual, I have more photos of this manicure, and further down, you'll find a list of products, and I'll tell how I did this.

Although I can't win the prizes, (because I don't have a mailing address in Canada or the U.S.) you can vote for me. Just click here to vote for your favourite, or if you want to take a look at the other entries. If you want to join in, you can find all details and sign in here.


What I did:

1. I started with white nails. Then I made a pink- white gradient. I mixed pink and white nail polish on my palette (the back side of a stamping plate) with a dotting tool, and used a sponge.
2. For the layer of snow on the tips, I used the one stroke technique. I used pink and white acrylic craft paint for that, and a small angled brush. Usually I use fast drying top coat between layers, but this time I added a shimmer top coat first; one coat of IsaDora #769. (It shows IRL.)
3. Then I used different stamping plates, and a XL stamper for the fairy. For the snowflakes I used a Konad stamper most of the time, and white, pink and red Konad stamping polishes. And I made some dots from the fairy's wand.
4. The photos were taken inside. Because it was dark outside, I brought  a bag of snow to the kitchen, and made a little snow photo studio. I used an Ott- Lite, and held my hand in a shoe box with white sheets of paper inside. To not get everything wet, I placed a plastic bag under the snow. I've recently started taping pizza baking paper on the Ott- Lite, after seeing this photo tutorial on My Awesome Beauty. An Ott- Lite lamp is a good alternative, if you live in Canada or other places where there's little winter daylight.

After taking photos with Ott- lite yesterday, I had a chance to take photos in daylight this morning. The one taken in daylight is the first photo, and there you can see the shimmer better. But the gradient shows better on the other photos.


Products used:

IsaDora: #600 (base coat)
IsaDora: #603 Tip White
GOSH: #598 Bubble Gum (pink)
dotting tool
sponge
Acrylic craft paint: Titanium White (white), Rose (dark pink)
small angled brush
IsaDora: #769 Mother of Pearl
Seche Vite (fast drying top coat)
Konad stamping polish: Red, Psyche Pink, Pastel Pink, White
XL stamper
Konad stamper
lint roller (to remove polish from the stamper)
Stamping plates:
Fairy and snowflakes: MoYou London: Princess 07
Snowflakes:
MoYou London: Princess 02
MoYou London: Artist 04
HB-23
BM- 323
1 little bag of snow (for the photos)


I hope you liked these pink snow nails, and that you'll participate in this challenge too. I wonder what the next theme will be.

Lani

Thursday, July 11, 2013

Tri- Polish, Day 16/ June #4: Cherries


Hello everyone!

 Cherries
This started as stamping nail art, and after painting over and over it, it ended up like this. The red nail polish I used for the cherries is actually called Cherry!  I didn't  notice that  until now when I sit here writing. As you might have seen, I've shortened the headline a little. This is "The Tri- Polish Challenge". I wonder if I should start calling it "TPC, Day..." or do as I've done today. What do you think?

 Cherries


Sorry about the extra text on the photos lately. Today I've made the text bigger on some photos, more transparent on some, and placed it where it felt best on each photo. Do you have any ideas or advice? I'm thinking about changing the watermark.

 Cherries

What I did:

I started with purple nails, and used the rose stamping plate from Messy Mansion and a regular gold polish to stamp the leafs. Then I made two big pink dots, and added red, and mixed them together so that it could resemble cherries. Then I used a black striper to make two lines by the cherries. The leafs looked too sheer, so I tried to outline them. Not being good at that, I filled in the center of the leafs with black too. Then I found my tiniest round brush, and tried to paint gold stripes to make the leafs more naturalistic. But it kind of looks like I just put a lot of gold nail polish on the leafs. The gold glitter is supposed to resemble leafs, and the red glitter is supposed to resemble cherries. I also added gold glitter where I felt that something was missing, and on the tips, and top coated. I use Seche Vite. And I use it whenever I do something I like. I'm still so new to this that I have to save what's good (with a layer of top coat) before I ruin it. Because then if I'm very careful, I can an remove the bad stamping (or stupid thing I have done) with a brush dipped in acetone. After all this talking, I hope you're  ready for the rest of the photos :-)

Cherries

Cherries

Cherries

Cherries

Cherries

Cherries

Cherries

Cherries

Used:

GOSH: #571 Wild Lilac -purple
GOSH: #598 Bubble Gum -pink
H&M: Cherry- red
H&M: Run Baby Run -gold
H&M: Black -nail polish with striper brush -from a set with white, red and black
Orly: Rockets Red Glare - red glitter
Deborah Lippmann: Boom Boom Pow- gold glitter
Messy Mansion: MM07 -stamping plate
tiny brush
dotting tool


Cherry, Bubble Gum, Wild Lilac, Run Baby Run, black striper, Rockets Red Glare, Boom Boom Pow


This is the last Tri- Polish nail art for June. I'm not sure if I should continue with this challenge, because I often post too late. And I have very many swatches that I should have showed you, in addition to other nail art ideas. I've also started to really like stamping.

Below you can see what the other participants made for this challenge day!


Lani


Saturday, June 29, 2013

MI-NY: #56 KLIMT (on it's own and used for nail art/ layering)


Hello everyone!

MI-NY: Klimt


MI-NY: KLIMT is a pastel turquoise cream nail polish. It's a 1- 2 coater, and very easy to work with. The color is a little bit greener than on my photos. I bought Klimt in February, and have already used it several times. So now I want to show you what it looks like on it's own, and used for nail art. And I'll try to update this post when I use Klimt for nail art or layering in the future. This first photo was one of my entries to MI-NY' swatch competition called WE LOVE NAILS.

MI-NY: Klimt


I swatched some of my MI-NY polishes, but didn't get time to swatch all of them. I had planned to write blog posts about them too, but haven't had time or been sick...

MI-NY: Klimt


Color comparison

I called the color pastel turquoise, but some would perhaps call it blue-green or pastel teal. As I mentioned Klimt looks a litte more green and less blue than on these photos. Compared to my other polishes in this color family, Klimt is like a pastel version of H&M "Bella's Choice". Klimt is more pastel than Picture Polish "Honey Dew", but "Honey Dew" is a little more green. H&M "Mint Madness" looks like a dusty pastel green, and not turquoise at all, compared to Klimt.

MI-NY: Klimt

MI-NY: #56 Klimt used for nail art or layering:


1) One of the last challenges in the Sat- ART- Day Club, back in February, was "Dotting tools". This was my entry for MI-NY's nail art contest called "WE LOVE NAIL ART", but I didn't win. Details about the mani and more photos in the blog post.

Klimt used for nail art

2) This was made for World Ovarian Cancer Day. The first photos are taken before adding the flakie top coat. I don't think I've shared the first two photos before. Details and more photos in the blog post.

Klimt used for nail art

Klimt used for nail art

Klimt used for nail art

Klimt used for nail art
 With the flakie:

Klimt used for nail art


3) MI-NY's flakie "I LOVE LONDON" layered over Klimt and other polishes. This was an attempt to show what the flakie looks like over different colors. I made it for MI-NY's swatch contest; "WE LOVE NAILS".

MI- NY: "I Love London" layered over Klimt


4. Love is Love - Pastel Rainbow Hearts- Valentines Day nails #8, NPC's Valentine's Day Nail Art Challenge, and #31Nails2014 Day 19 Rainbow


As I've said before, MI-NY is an Italian brand, and according to their answer on facebook they do not test their products on animals. Their web site has a list of MI-NY stores.


Lani