Wednesday, January 9, 2013

Something New -Polish Days January


PAINTED & MAGNETIZED


Hello everyone!
(This blog seems to look best in Google Chrome)
Painted & Magnetized


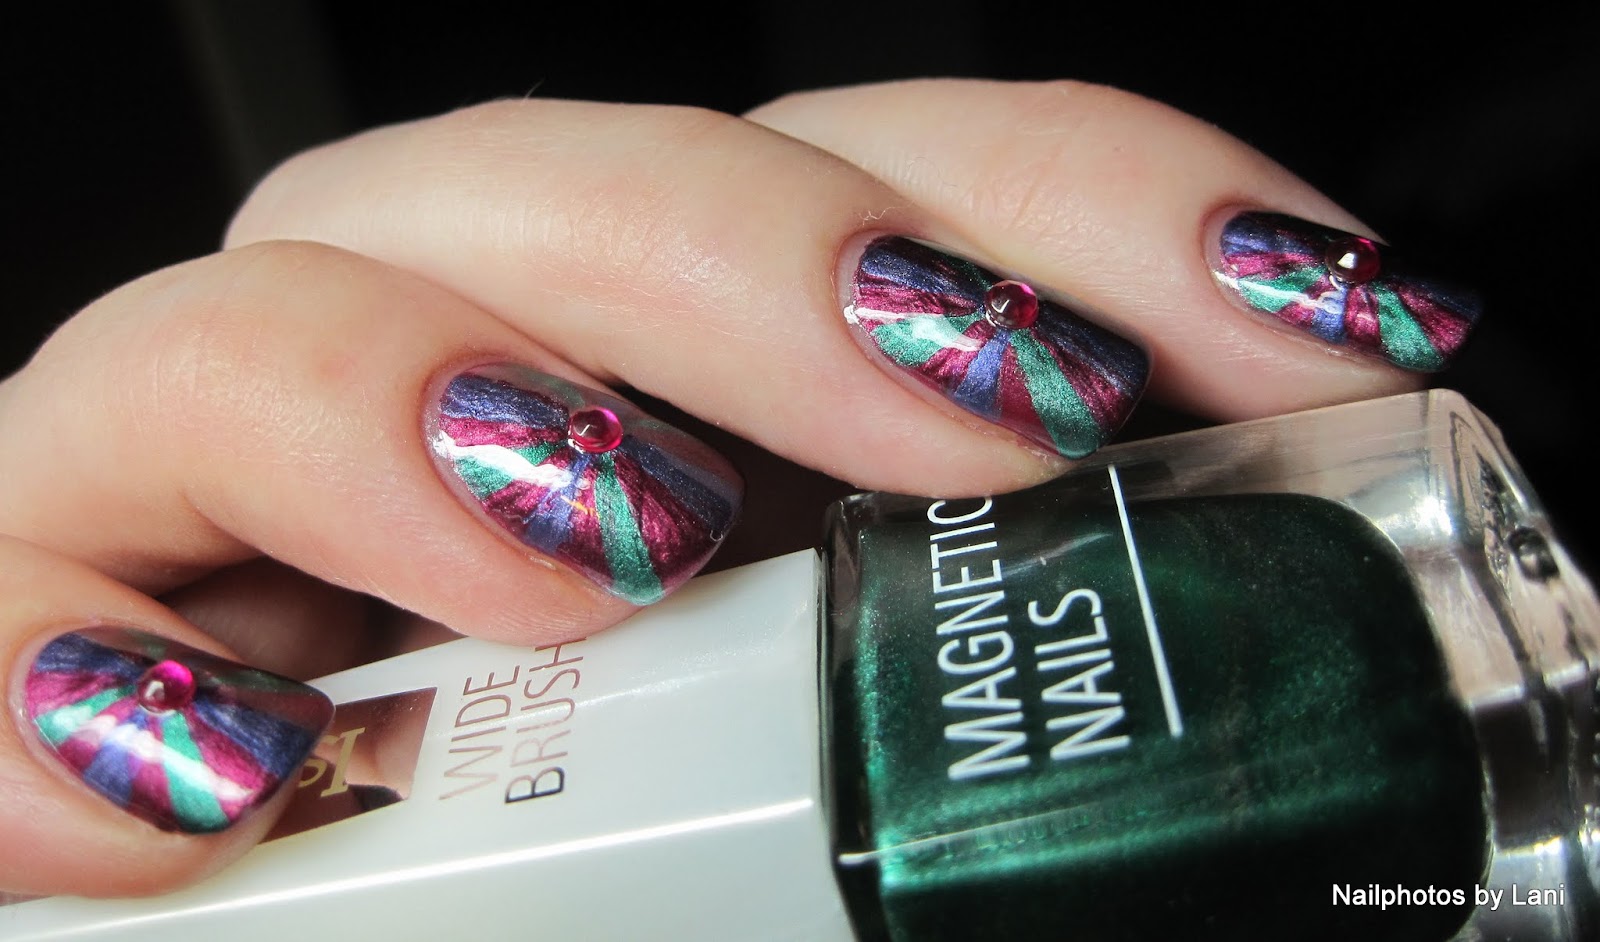
For Polish Days January we are all going to make something new. I have used this technique once before, but this is the first time I use the same pattern on all nails. And this time I use red/ magenta, green and blue/ blurple, and added rhine stones. The pattern is created by first painting a pattern using magnetic nail polishes, and then make a second pattern with the magnet after applying top coat.

Painted & Magnetized


For information about Polish Days, and how you can join in, just click on the badge below, and you will find everything you need, explained by Hannah from Polly Polish. She is the one who started Polish Days and she organizes it.


More photos:

Painted & Magnetized

Painted & Magnetized

Painted & Magnetized
 
Painted & Magnetized

Painted & Magnetized


Painted & Magnetized

Painted & Magnetized

Painted & Magnetized

Painted & Magnetized


I wasn't good at placing the magnet this time. I wish the inner circles were placed in the middle, where the stripes met. I also wish I had managed to make a more smooth surface.

Used:

Tiny brush
Palette
Magnet: China Glaze Magnetix II
Base- and top coat
Magnetic nail polish:
Deborah Lippmann Magnetic Wave: Love is A Battlefield (magenta)
IsaDora Magnetic Nails: 854 Opposites Attract (green)
Prestige: NMM-03 Topaz (blue/ blurple)
Rhine stones (fuchsia)

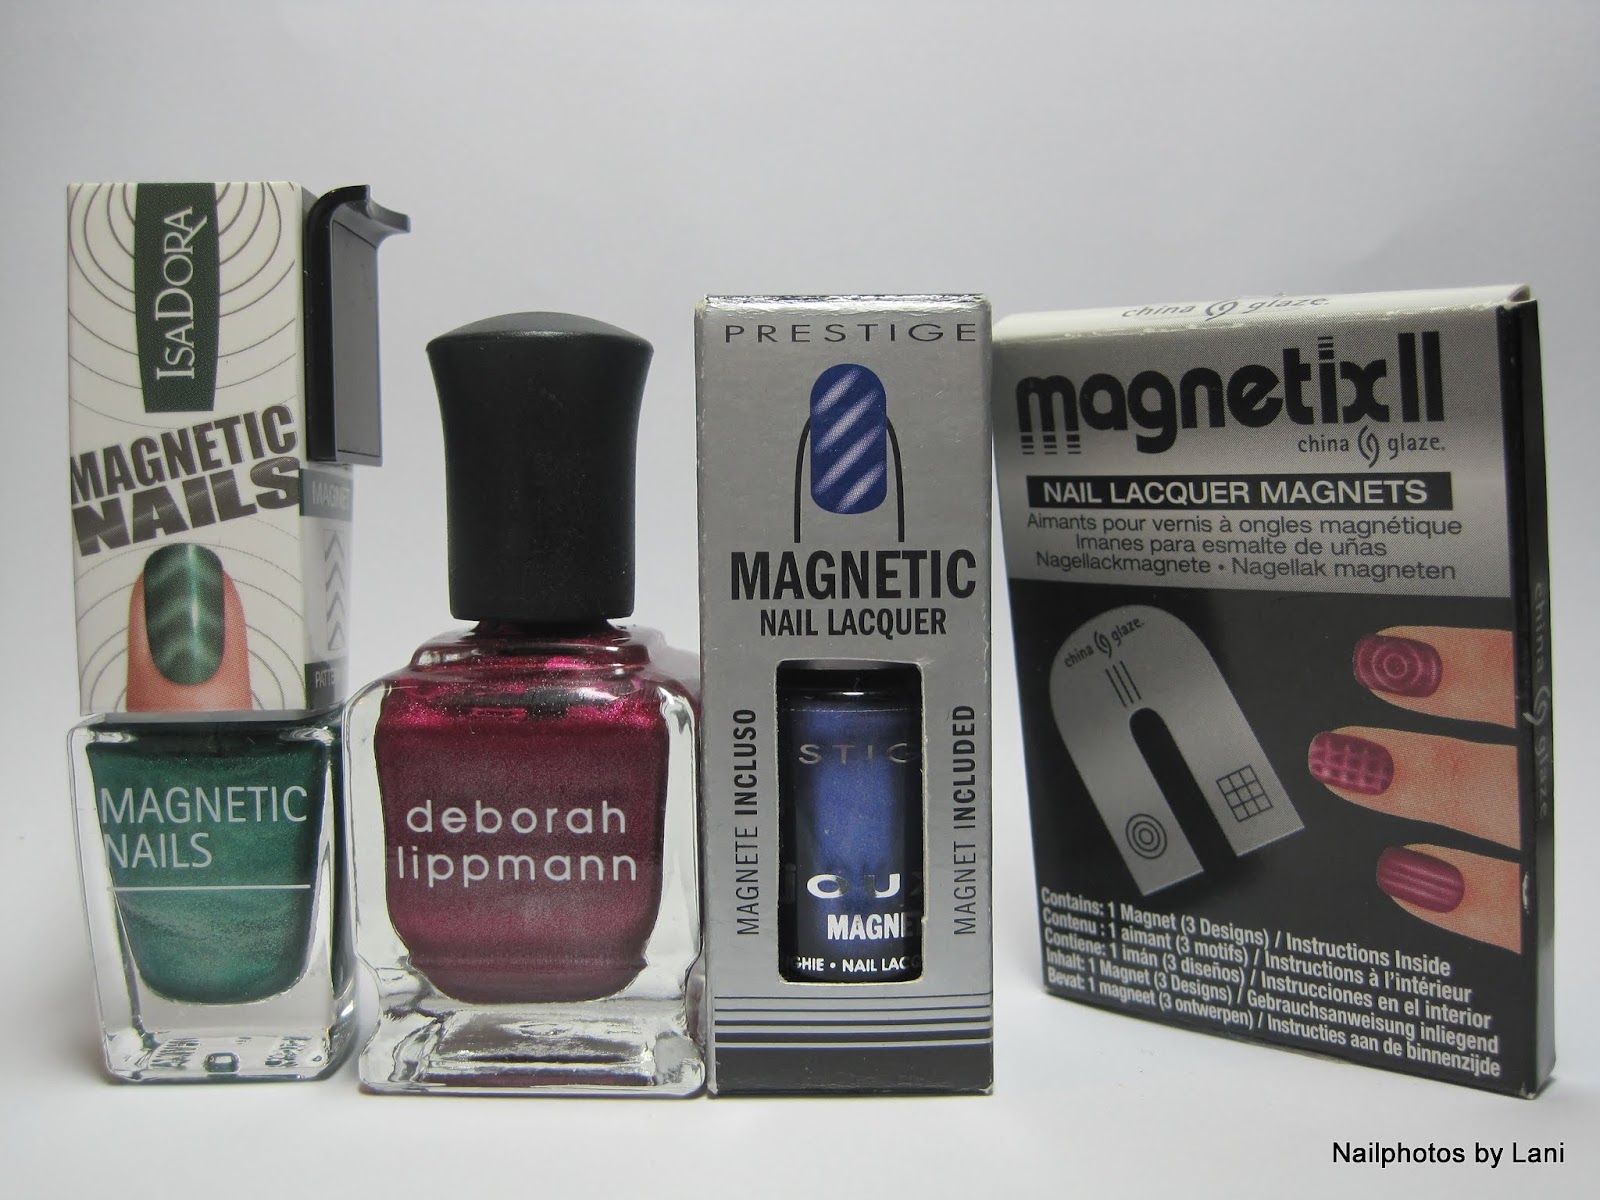
IsaDora Magnetic Nails 854 Opposites Attract, Deborah Lippman Magnetic Wave Love is A Battlefield, Prestige NMM- 03 Topaz, China Glaze Magnetix II magnet, Used for my Painted & Magnetized mani

China Glaze Magnetix II magnet, bulls eye pattern, Used for my Painted & Magnetized mani

Dotting tool, fuchsia rhine stones, Bundle Monster nail art wheel, Used for my Painted & Magnetized mani


The rhine stones are from one of the 5 nail art wheels I chose when I won a Chit Chat Nails Bundle Monster contest! :-) Link: Nailart Nail Art Glitters Beads Rhinestones Wheel from Bundle Monster. The other thing I chose was the 2012 stamping plates.

Painted & Magnetized, Bundle Monster nail art wheel


Below, you can find thumbnails with links to all the participants' posts.

Lani

H&M: Je t'aime


Hello everyone!

H&M Je t'aime


Today I want to show you Je t'aime by Hennes and Mauritz (H&M). It is red with a gold shimmer. These photos are from November, so I'm not sure if I used two or three coats any more. I have to start writing everything down again. Remember to look at the shape of my nails; It was the week I had square, quite long nails! I hope it will happen again...

H&M Je t'aime
I feel that the photos above are as color accurate as I am able to get them on a photo. The first photo below is without top coat, the rest are all with Seche Vite top coat. I had just bought it, and I think it was the first time I used it.

H&M Je t'aime

I must admit that I loved this nail polish so much that I went back to H&M to get the other bottles in this collection. So now I have all four of them; a white (Mon amie), a gold (Antique gold), and what I would call a vintage looking coral (Oh la la). All with gold shimmer The bottles that look like this one are 8 ml. H&M is Cruelty- free :-)

H&M Je t'aime


H&M Je t'aime

H&M Je t'aime

H&M Je t'aime

H&M Je t'aime

H&M Je t'aime

H&M Je t'aime

H&M Je t'aime

H&M Je t'aime

H&M Je t'aime

H&M Je t'aime

H&M Je t'aime

H&M Je t'aime

H&M Je t'aime

H&M Je t'aime

H&M Je t'aime

H&M Je t'aime

H&M Je t'aime

H&M Je t'aime

H&M Je t'aime

H&M Je t'aime

H&M Je t'aime

H&M Je t'aime

H&M Je t'aime

H&M Je t'aime

H&M Je t'aime


When I looked at all these photos today, it seems like I somehow knew that I had to take pictures of my nails to make them last forever. If I really knew they would only last for a week, I don't know what I would do...  ... maybe change nail polish all the time? And photograph as many unswatched as possible.

H&M Je t'aime+ KKCenterHk Christmas Stickers


Above is a photo with one of the Christmas Stickers. You have seen/ can see my Christmas mani, where I used H&M Je t'aime and the Christmas Stickers from KKCenterHk, here. This last picture is also a good example of what this polish looks like.


Lani

Friday, January 4, 2013

I got my nail repaired! My first time in a nail salon


Hello everyone!


I broke one nail, and eventually decided to get it repaired so that I could do some nail art again. But of course I had to wait for an appointment. With one nail broken, little daylight, and also the fluorescent that I use to photograph my nails had to be changed, and I couldn't figure out how to do it, in addition to a lot of stress, I didn't see the point in wearing nail polish. Nail polish would just make the damage show better. By the time I went to the salon, I really longed for wearing nail polish again.

Before: 

I have never before broken a nail this short. The photo is taken after the nail has been allowed to grow for a week!!!


After:


She fixed my broken nail by gluing on a tip, and put acrylic on top of it. It was fascinating to watch her work, putting a wet brush into a powder, creating a kind of jelly on top of the nail, as I have seen on YouTube. Then she made a smooth surface. The time I had to wait, my long finger nail had started to tear on one side, and I had put some nail glue on it. Luckily she had time to do something with that too. What she did was to put acrylic over that one too. And I had to put my hand into a machine with blue light. (I wonder if it is the same light that dentists use to make the plastic hard.)

If you look closely, you can see that the two repaired nails are wider than the other nails. That's why it's tempting to do it on all nails, but I guess it would be too expensive to keep them that way. But I would get more room for nail art... And I would save time, because I wouldn't need base coat :-)

The nail polish used above is Zoya Aurora. Two coats+ top coat.

This is what the repaired nails looked like without nail polish:


This is what it looked like before the Panda mani. And after that day I have managed to ruin the repaired nails more and more...

I wish my nails could have stayed like they were in November...

What do you do when nails break? Are you able to repair them yourself? Do you prefer natural nails or do you have something else to recommend?


Lani

Thursday, January 3, 2013

New Year's Eve Nails


Happy New Year!

New Year's Eve Nails


My new year's eve mani is supposed to look like fireworks.

New Year's Eve Nails


I started out with black, and stamped using a lot of nail polishes and the MM02 stamping plate. The test stamping went better than expected, and I liked that each nail looked different, so I only changed the index finger. But because the Color Club and the b.young polishes gave such a nice effect, I used them on both hands. Then I put a drop of red stamping polish on the plate, and mixed it with a drop of white stamping polish, to make the text.

GOSH: Nero, New Year's Eve Nails

Test stamping, New Year's Eve Nails
New Year's Eve Nails

New Year's Eve Nails


What I used:


Image Plate MM02, New Year's Eve Nails


Messy Mansion Image Plate MM02
Stamper and scraper


These bottles were used for my New Year's Eve Nails


Nail polish (left- right):

KONAD: red Special Nail Polish
GOSH: Nero
KONAD: white Special Nail Polish
ORLY: Rock Candy
GLITTER GAL: 707H Silver 3D/ Holo
IsaDora: 600 Clear
NUBAR: Reclaim
Gina Tricot Beauty Nails: 66 Viva Glam
b.young: No 22
GOSH: 549 Holographic Hero
Color CLUB: 977 Cloud Nine
Seche Vite: Dry Fast Top Coat

New Year's Eve Nails


Lani