Showing posts with label Enchanted Polish: Hey Jude. Show all posts

Sunday, October 12, 2014

52 Week PICK N MIX Challenge - 3 colour gradient


Hello everyone!


The prompts for this week are "3 colour gradient" and "pink". I've already showed you my pink mani. This is my gradient. To see my photo tutorial and read how I made it, click here. This was the base for a stamped manicure; Autumn: Leafs over a Multichrome Gradient.


I used:

fast drying base coat: IsaDora: #600 Clear

black polish: GOSH :Nero
a fanbrush
a toothpick
and 3 multichromes from Enchanted polish:

Enchanted Polish: Magical Mystery Tour 
Enchanted Polish: Hey Jude
Enchanted Polish: I Am The Walrus

fast drying top coat: Seche Vite

a fake nail for my broken pinkie


I had to publish this before the deadline. Now I've added more photos:

Daylight:


I think the rest are taken under this LED lamp.


If any of you nail polish makers are reading this; Please make some pastel multichromes and bright multichromes! :-)


Lani

Thursday, September 26, 2013

How I made the multichrome gradient


Hello everyone!


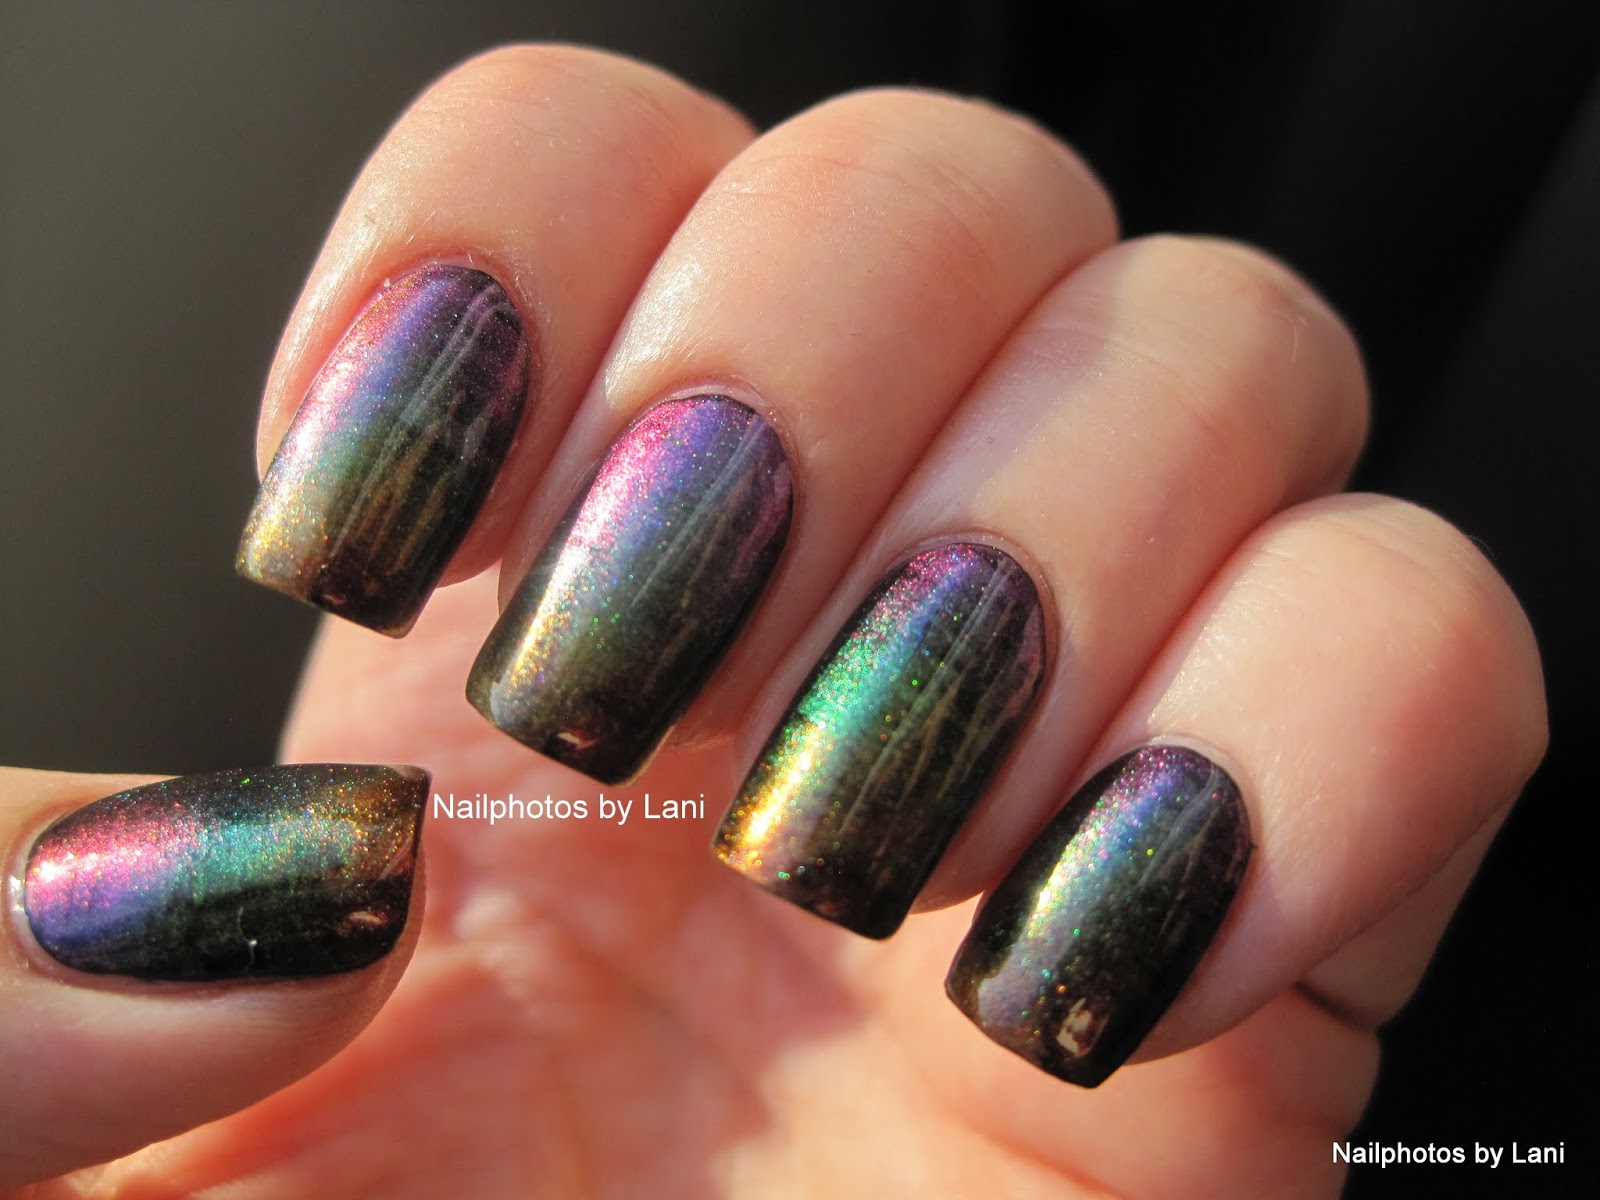
I took some photos when I made the multichrome gradient that you saw in my last post, (before I stamped the leafs over it). So if you're interested in a photo tutorial, just keep reading. I'm not taking credit for the method, I'm just showing you how I did it. I think I learned to use a fan brush from a Cutenails YouTube video, and how to mix the colors with a toothpick before making a gradient from The Nailasaurus. This is an easy and quick way of doing it when you use three polishes or when the polishes are transparent.

1. Apply basecoat, and a black cream nail polish, and top coat. (I chose to use black here, but you can do what you want of course.)


2. When the base is dry, find what you need for the gradient. This is what I used:


3. Put a drop of polish from each bottle on a line, leaving a little space between them (for mixing). (But maybe it was a bad idea to leave space between them...) Use the toothpick to mix two of the colors. I used the other side of the toothpick (or wipe it) to mix the other two colors. This photo is taken after that was done:


4. Dip the fanbrush in a way that picks up all the colors. Because the brush and the line of nail polish was wider than my nail length, I did it like this: I dipped one side first, and wiped up the middle, and then the other side. Then I brushed a few times back and forth on the plastic to make it blend a little, and to get all the nail polish onto the brush.


5. Brush it on one nail from side to side. Then start on 3 again, and do each nail the same way. (I know that the stripes of the fanbrush is visible, but that didn't bother me. If you want to, you can add one more layer.)


6. Then I cleaned up the nail polish around my nails with a flat brush dipped in acetone. (Because one nail was fake, I used acetone- free nail polish remover on that one). I usually take some photos before top coat is added. But I'm just showing one here.


7. Then I applied top coat. If I should stop here, I would have applied cuticle oil too. But I wanted to do some stamping, so I don't think I did. But sometimes, if I have used cuticle oil, I just use a Q-tip dipped in hand sanitizer to get the nails oil free before the stamping. (Not sure if that actually helps... Lol!)


That's it. It was quick and easy. But with cream nail polish I would probably use a sponge. What do you think? If you have good ideas on how to do this better, please tell me in a comment.


Complete list of what I used:


fast drying base coat: IsaDora: #600 Clear
fast drying top coat: Seche Vite
GOSH: Nero (black creme)
Enchanted Polish: Magical Mystery Tour (teal- purple- etc. multichrome)
Enchanted Polish: Hey Jude (green multichrome)
Enchanted Polish: I Am The Walrus (copper multichrome)
fanbrush
toothpick
plastic bag (as palette)
flat brush (for clean- up)
acetone
nail polish remover
egg glass (for the acetone)
cuticle oil: Mi- Ny: Therapy Oil+ Cuticle & Nails With Vitamines E & F

Mi-Ny, Enchanted Polish, Gosh, and IsaDora are not tested on animals. (I have no information about Seche Vite.)


I have a lot of photos of the gradient, but I guess you want to see something else now, so I'll wait a week or something, and show the rest of the photos then. Unlike the photos (with the leafs) in the last post, the ones above are taken before the sun went down.

Lani

Tuesday, September 24, 2013

Autumn: Leafs over a Multichrome Gradient


Hello everyone!


Sunday's challenge in Adventures In Stamping was "Autumn nails". I was inspired by Deborah from Love. Varnish, chocolate and more..., and wanted to try to make a multichrome gradient too. I used three polishes from Enchanted Polish's "The Imagine Collection" for the gradient, over a black base. Then I top coated and stamped black leafs over it, and top coated again. The leafs are from Messy Mansion's "Rose plate"; MM07. If you want to see a rose mani I made in May when I used MM07, click here. I've also used the leafs from MM07 to help me paint leafs in this cherry mani.


Used:

GOSH: Nero

Gradient:
Enchanted Polish: Magical Mystery Tour (also used here and here)
Enchanted Polish: Hey Jude
Enchanted Polish: I Am The Walrus

Stamping:
Plate: MM07 from Messy Mansion
Stamping polish: Konad: SP Black
XL Stamper set

I used my soft squishy stamper for the first time, and now I understand what everyone was talking about. It's easier to use than my regular stampers, especially for curved nails.


There are no underwater pictures this time, because I had a little accident when coloring my hair. Apparently there was a hole in my glove... My finger has finally got it's skin color back, but it looks like I've done a very bad attempt of brown louboutin nails... Here is one photo taken in daylight after a lot of stress trying to make my finger tip look normal.


All the other photos were taken after it got dark, some in Ott-Lite, some under a fluorescent tube lamp, but most of them under an IKEA LED lamp.

I don't know why my nails always brake when I want to use Enchanted Polish. This time the pinkie nail is fake. It's still so short that it's impossible to cut the other nails to the same length. So maybe I have to use the other hand next month. But at least I've learned that it's easier to show all the colors of a mulitichrome on nails that are curved, than on my natural nails.


These Enchanted Polish multichromes are HTF at the moment. These were bought at Norway Nails, but they are sold out at the moment, so it's not possible for me to link directly. Some of them can be bought on eBay right now, but it's more expensive there. My advice is to find out which online stores that are shipping to your area, and find out when they are restocking Enchanted. You can try Harlow & Co, Norway Nails, and Llarowe. You can also take a look at Enchanted Polish's web site and facebook page.

Other brands also produce multichromes, but I don't know if they are cruelty- free.


Lani