Hello everyone!
 |
| Sunset/ Fall gradient |
I finally felt like wearing bright colors. I hardly did that this summer. And now when it's getting colder, I felt that everyone would stare at my very bright colored sunset nails. But when I went for a walk to take some photos of them, I looked at the leafs, and suddenly realized that my nails were more like a fall camouflage!
 |
| Sunset/ Fall gradient |
 |
| Sunset/ Fall gradient |
 |
| Sunset/ Fall gradient |
 |
| Sunset/ Fall gradient |
 |
| Sunset/ Fall gradient |
 |
| Sunset/ Fall gradient |
 |
| Sunset/ Fall gradient |
 |
| Sunset/ Fall gradient |
 |
| Sunset/ Fall gradient |
 |
| Sunset/ Fall gradient |
 |
| Sunset/ Fall gradient |
 |
| Sunset/ Fall gradient |
 |
| Sunset/ Fall gradient |
To make this manicure I used:
IsaDora: #03 Champagne Sorbet
M&M: Yellow (from a mini set) -yellow creme
GOSH: #570 Peachy- orange creme
GOSH: #598 Bubble Gum- pink creme
GOSH: #610 Blissful- red/ dark pink creme
Kleancolor: #228 Chunky Holo Candy
base- and top coats
a sponge
a toothpick
 |
| Used for Sunset/ Fall gradient |
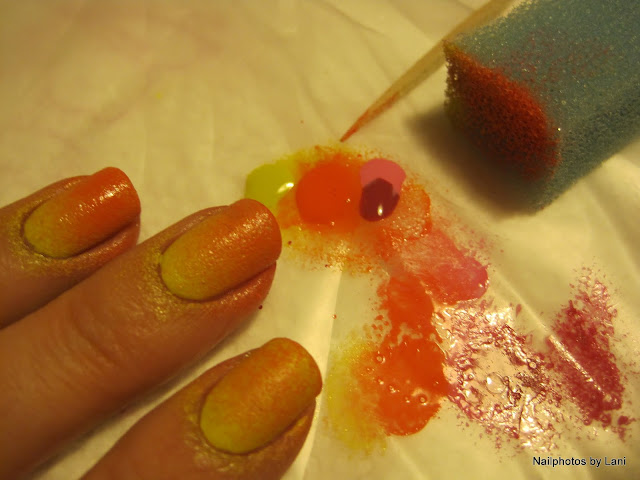
I felt that two coats of the IsaDora didn't give the right base for this, so I covered it with the yellow. Then I used the yellow, orange, pink and red nail polish to make a gradient with the sponge. I used the toothpick to mix the colors on a piece of plastic, like The Nailasaurus shows in this tutorial. The pink was only used to mix with the red. I used the sponge in different ways until I felt that it was good enough.
 |
| Making of Sunset/ Fall gradient |
Then I applied one coat of the Kleancolor polish, to even the colors, to add more of the pink- coral color, and glitter. (I think I learned that from a YouTube video.)
I think I used way too much polish, and therefor I used both of my fast drying top coats: L.A.Color (Rapid Dry) and Cult Nails (Wicked Fast). I made one gradient before this one. And that one got ruined after 30 min. when I had to do the dishes, even though I used gloves. So that's why. What I did then, that I didn't do now, was to add a top coat before the glitter. I think that would have evened out the colors even more. I included one photo of my first attempt, because it shows the transformation of the Kleancolor polish so well:
 |
| Making of the first Sunset/ Fall gradient |
 |
| Sunset/ Fall gradient nails with Kleancolor #228 Chunky HoloCandy |
About the sponge:
I have seen that most of you use a makeup sponge. This is a car sponge. :-) My friend gave me his two backup car sponges to use for nail art. He is so kind. I cut off a piece of the sponge, and it worked well. And next time I use it, I just cut off the part with dry nail polish. But if I was making a gradient that I wasn't going to cover with glitter, a finer sponge would possibly have been better.
 |
| Making of Sunset/ Fall gradient |
This gradient was meant to be the base for my Hawaii nails, but I liked it so much that I wore it like this for many days before I started stamping on them. This manicure by Susy in Color, that again was inspired by this manicure by Pshiiit was my main inspiration.
Lani
Very nice gradient!
ReplyDeletelove this! soooo pretty :D
ReplyDeleteThis is gorgeous! Really looks like a sunset and I love the addition of the glitter on top as well =)
ReplyDeleteHi zebra-nails, Lacqueerisa Says and Jacqui!
ReplyDeleteThank you! I'm glad you liked it! :-) Your feedback means a lot to me.
Lani
This is soooo pretty and a great gradient combo!
ReplyDeleteThank you! :-) Yes, this was one of those times when the polishes worked as I had hoped.
Delete